Tools
Go to Coordinates
The "Ir a coordenadas" ("Go to coordinates") functionality allows the user to move to a location knowing its coordinates.
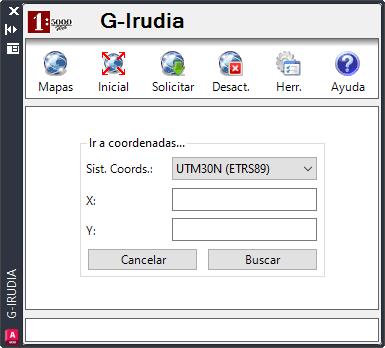
Coordinate Systems
- UTM30N (ETRS89): Coordinate System UTM 30 North European Terrestrial Reference System 1989.
- UTM30N (ED50): Corodinate System UTM 30 North European Datum 1950.
- WGS84: WGS84 geographic coordinate system.
Search
To perform the coordinate search, you must enter the values (X / Y or Longitude / Latitude) and select the appropriate coordinate system (by default, the coordinate system of the current map).
Coordinate search only centres the map over the coordinates, without zooming in.
Get LIDAR Altitude
Options
- Models
- Flight, Ground
- LIDAR version
- 2005, 2008, 2012
Altimetric Frame
- REDNAP08 (Alicante): orthometric REDNAP08 NMM Alicante
- Ellipsoidal
- EVRF2000 (Amsterdam): orthometric EVRF2000 NMM Amsterdam (provisional European altitude)
The available coordinate systems can be found in the drop-down "Sist. Coord.". When selecting a location in the drawing with the UTM (ETRS89 or ED50) coordinate systems, the coordinates obtained will be rounded to "x.5", the centre of the one-meter-sided box for which the service assigns the dimension.
How to Get the Altitude

There are two possibilities when it comes to obtaining the altitude of a point:
- Press the "1" button, the coordinate system of the current map is selected and the selection of a point on the drawing is requested to obtain its altitude.
- Manually enter the coordinates (they must belong to the coordinate system selected in the drop-down) and press the button identified as "2".
- Mark the altitude. When you get an altitude, a one-meter-sided box is displayed in the drawing that represents the area covered by the obtained altitude. This box disappears when scrolling or redrawing.
- Close the app.
Search Municipalities
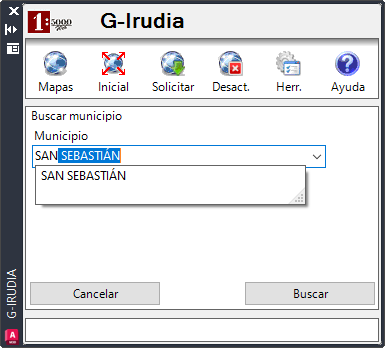
The search for municipalities allows to centre the map on a municipality.
Terrain Profile
This tool allows the user to obtain the profile of the terrain associated with a polyline drawn by the user. When activating the tool, the user is required to define a polyline of up to 10 vertices and the following information is displayed:
End of the Polyline
- When you reach 10 vertices the polyline is automatically finished.
- By pressing the "Enter" key (or the space bar).
- By right-clicking.
Once the polyline is finished, the profile of the associated terrain is obtained, and it will be displayed in an independent terrain profiles window.
Terrain Profiles Window
It is allowed to have a single terrain profile window open, so if a new profile is requested, it will be loaded into the open window.

Operations
- Show the altitude at a point: To do this, bring the mouse cursor to the surface of the profile at the desired point.
- Zoom in/out of profile: With the mouse wheel, you can zoom in or out. Double-clicking the mouse wheel returns you to the initial zoom.
- Export the profile: The buttons at the bottom allow you to save the current profile in different formats (PNG, SVG or PDF).
Entity Identification

Through services offered by the Provincial Council of Gipuzkoa
Among which we can find elements such as: buildings, roads, toponymy, rivers, cadastre, etc.
Objects that are on the map through the WMS service
At least one of the layers that make up the current map has to be searchable.
- The user must select the point on which the identification is to be made.
- The results are displayed in a separate window.
If you want to keep the results of the previous identification when making a new one, it will be enough to check the box "Mostrar resultado en nueva ventana" ("Show result in new window").
- Response formats
- XML, HTML, Text